Shift Wall
Back to the Climbing Wall Design Vault
*These designs are provided free of charge as inspiration for your personal projects. They are not foolproof, and we assume no liability and cannot be held responsible for any injury or damage incurred in relation to their use. Building your own climbing wall is dangerous, use at your own risk. That said, good luck!
Complete CAD files here: SHIFT.STEP, SHIFT.STL


The Shift Wall was designed to maximum the use of a small space, and avoid any reliance or damage to the existing structure of your room.
Features
- Freestanding.
- Adjustable from 0-50 degrees (5 degree increments).
- Winch powered (hex drive, allowing hand operation or your drill/driver)
- Secondary wall that transitions from a horizontal roof to a plane nearly parallel to the main wall.
- Training station in front, consisting of a long pullup bar and a hangboard platform. The platform angle does vary slightly, but stays within 4 degrees of vertical throughout the entire range of motion.
Specs
Extended Footprint: 126 x 160"
Retracted Footprint: 126 x 72"
Total Vertical Height: 107"
Kicker: 12"
Cost: $700-900
Skill Level: Intermediate/Advanced
*Some steps in the assembly will require a minimum of 3 strong individuals.
This is relatively complex build. Be sure to read through this tutorial completely to be sure you are confident you have the skills, resources, and confidence needed to complete it. This design package will walk you through 80% of the details. Things like screw spacing, predrilling holes, etc. we leave up to you. We assume you are already a competent carpenter.
And as always, BE SAFE! Wear your safety goggles, hearing protection, gloves, etc.
Step 1: Assemble Tools
You will need the following:
Cordless Drill / Driver (DeWalt has never let me down)
7/16” Drill Bit (We recommend a Spade Bit)
⅛” Standard Drill Bit
Measuring Tape
Level
Straight edge (48” preferred)
Pencil
Random Orbital Hand Sander (or just sandpaper)
Clamps/weights (optional, but useful)
Step 2: Purchase Materials
Order the T-nuts you prefer on Amazon (see links on the shopping list below, for more detail check out our article "Building a Climbing Wall"), then take a trip down to your local HD. Bring this list, and feel free to ask one of their associates to help you hunt it all down. You can also pre-order most if not all of it online and have it ready to pick up for you. They will not have T-nuts, unless they've become even more cool since this article was written.
Before you leave: HD has an awesome service available where they will cut any wood product you purchase there to size for you. This will save you a lot of time and necessary tools. The cut list is provided below the shopping list. The total cost for this list is around $700, but please note that this does not include any paint, climbing holds, or climbing mats.
Shopping List:
| Quantity | Product | Price/Unit | Link |
| 5 | 0.68 in. x 4 ft. x 8 ft. CMPC A/C Plywood | 38.98 | |
| 7 | 2 in. x 4 in. x 96 in. Prime Whitewood Stud | 5.48 | |
| 2 | 2 in. x 4 in. x 10 ft. Standard and Better Kiln-Dried Heat Treated Spruce-Pine-Fir Lumber | 7.72 | |
| 7 | 2 in. x 6 in. x 92-5/8 in. Select Kiln-Dried Heat Treated Spruce-Pine-Fir Lumber Stud | 7.82 | |
| 7 | 2 in. x 6 in. x 10 ft. #2 and Better Prime Douglas Fir Board | 13.36 | |
| 1 | 3/4 in. x 10 ft. Black Steel Pipe | 20.76 | |
| 2 | 3/8 in. Zinc-Plated Flat Washer (25-Pack) | 3.98 | |
| 1 | BOLTS - 25 PACK - 3/8-16" - BLACK OXIDE | 17.00 | |
| 2 | #10 x 3 in. T-Star Plus Flat Head Interior/Exterior HCR-X Screw (67-Box) | 11.58 | |
| 2 | #10 x 2 in. T-Star Flat Head Interior / Exterior HCR-X Screw (99 per Box) | 11.58 | |
| 282 | INDUSTRIAL Round Base T-nut (Zinc) | 0.35 | |
| 2 | 1-1/2 in. Zinc-Plated Wall/Ceiling Mount Pulley | 5.98 | |
| 1 | 3/16 in. x 50 ft. Galvanized Uncoated Steel Wire Rope | 20.98 | |
| 1 | Dutton-Lainson Company WG1500HD 1500 lbs Worm Gear Winch with Hex Drive | 115.00 | amazon.com |
| 3 | 6 in. Heavy Strap Hinge in Zinc-Plated (5-Pack) | 24.19 | homedepot.com |
| 2 | GA 3-1/4 in. 18-Gauge Galvanized Gusset Angle | 0.97 | homedepot.com |
| 2 | TP 3-1/8 in. x 5 in. 20-Gauge Galvanized Tie Plate | 0.76 | homedepot.com |
Notes:
- You may consider purchasing paint, stain, varnish, etc. See blog article “Building a Climbing Wall” under “Finishing Your Climbing Wall Surface”.
- You may also consider using Liquid Nails construction adhesive to eliminate potential squeaks and add additional solidity to your wall (see Step 7).
Step 3: Cut and Drill Lumber and Ply


Yep, its a lot to take in. This will take some time, but just work through it methodically and you'll make it.
Step 4: Install T-Nuts
With the plywood facing climbing side down, install the T-nuts in each of their holes. Pronged T-nuts will need to be hammered in. We recommend having the plywood laid out flat on concrete (with a thin protective barrier) to act as a solid "anvil". It will bounce all over the place on a flimsy table. If they are screw ins, simply screw each one in place.
Step 5: Sand all the Edges
Use the random orbital hand sander to sand smooth all the corners, edges, and any splintering sections of the lumber and plywood. This is not absolutely necessary, but will dramatically improve the finished appearance and reduce the likelihood of splinters.
Step 6: Assemble Frames
There are three main frames that need to be assembled here: the kicker, the wall, and the roof.
*You will probably want to assemble these in the final location where you will keep the wall, they don't fit through most doors.*
Follow the illustrations below:
Kicker (2x6)


Wall (2x6)
*Ensure studs with holes are properly positioned


Roof (2x4)
*Ensure studs with holes are properly positioned


Step 8: Screw Plywood to the Frame
Place the plywood carefully on top of each frame, with the side you wish to face the climber facing up. Ensure proper alignment, and clamp in place. Proceed to screw the plywood to the frame using a 2” screw every 12-16", starting with the four corners.


Step 9: Surface Finish
It is usually easier to finish, coat, or paint your wall assembly parts before they are assembled, unless you wish to make a multi section mural or something along those lines.
Using the sander or sandpaper, go over any last spots that may be sharp or splinter prone.
Proceed to finish as desired. See article “Building a Climbing Wall” under the section “Finishing Your Climbing Wall Surface” for more detail on this.
Step 10: Assemble
You are going to want to have a couple friends on hand ready to help out here. These sections are heavy, and dropping one could cause serious damage to you and/or your wall. Be smart, take precautions, etc.
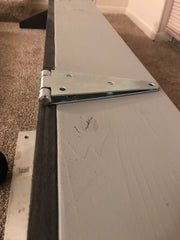
Install 5 hinges spread evenly across the top of your kicker. The barrels should be flush with the climbing face (see pictures).

Use blocks or your friends to hold the main wall in place at 90 degrees allowing you to screw mount the hinges to its base.
With the main wall attached to the kicker, prop it up so that the top end is ~4' off the ground. Mount hinges the same way you did to the kicker, then prop the roof section in place and fix to hinges. If you use strap hinges, the side mounted to the roof section will extend past the frame. Hammer the flanges over so that they do not protrude (see picture).

At this point the three sections should all be connected and flexible. Using an adjustable ladder, 2x4's, or another safe method, prop the assembly up in the position shown below. This will be very heavy, so be cautious and get help.

Mount vertical supports and front stringer in place. Arrange hinges as shown below.


Install T-nuts in the holes in the horizontal support members at the locations shown. Bolt support members in place using 3" bolts. Use washers under bolt heads and between members at pivoting joints. You will likely want to mark the position holes from 0-50 degrees (top is 0, bottom is 50, increments of 5 degrees)


Install wheels by inserting T-nuts into each circular panel and running a bolt through them. Feel free to get real wheels, especially if you are concerned about damaging the floor.

Mount winch and mount pulleys as shown. You will need to drill holes to match the winch mounting plate. Route cable following instructions on your winch.


The final step is to install the training station if desired. Assemble the platform, insert the bar through the holes, and then mount this assembly to the wall.

We recommend drilling a small hole in the end of the bar and screwing it in place to avoid rotation.

Complete!
If you made it this far, I tip my hat to you. It was a lot of work but now you've got one sick climbing wall.
Notes on Operation
Think of the horizontal support member as the lock, and the cable and winch as the adjustment mechanism. Unlock the wall first by unscrewing the bolts, then inserting them back into the support members and resting them against the front of the vertical supports (see image below).

Once both locking members are in this position, activate the winch until bolts are in position to swing into the hole marked for the desired angle. Bolt in place before climbing. See the video above to see this in action (toward the end). The process may take a little getting used to, but once you get familiar with your wall it will become second nature.
And of course, BE SAFE! Always climb with a pad, and a spotter when getting after it.
You may be interested in:
Bouldwall Climbing Panels

Climbing Holds

Climbing Mats

Hardware